Wouldn't it be great if you were able to use the debugging capabilities of an IDE in order to write custom Java classes and methods which you could then use in a JMeter BeanShell sampler? Well, you can and this tutorial will show you how.
Prerequisites:
- A way to create a JAR (I used NetBeans IDE)
- Java / JDK – you can download a NetBeans + JDK combo on this page
- JMeter
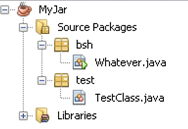
The first step is to create a class containing the custom method you’ll use in JMeter. For the purposes of this tutorial, I’ve created an example class which squares a given number. Begin by creating a new Java application project in your IDE. You should see a package and a single java file. Now you want to right-click on your project and create a second package (New -> Package), name it anything you want. From there, create a new Java file within the package. See the following example of what your project tree should look like.
You can see we've got our project called 'MyJar', and 2 packages named bsh and test. These packages each contain a Java file. You can see ‘Whatever.java’ has a play symbol which indicates the applications point of entry; you can see the code below for both Java files, comments inline.
 // Whatever.java
 package bsh; // belongs to the bsh package
 import test.TestClass; // importing our class (format: package.class) so we can test it
 public class Whatever { // our class
 public static void main(String[] args) { // this method will be run first
 TestClass t = new TestClass(); // create new instance of our TestClass class
 System.out.println(t.squareIt(8)); // testing our method
 }
 }


 // TestClass.java
 package test; // belongs to the test package
 public class TestClass {
 public TestClass() {} // empty constructor to keep things simple
 public int squareIt(int i) { // our square number method
 return i * i; // return the result
 }
 }
If you run this project, you should see the following result:
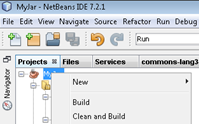
Now that we know our program works, we need to create a JAR from it. To do so, right-click the project and select ‘Clean and Build’.
This will compile and create a Jar. The location of the Jar file will depend on where you saved your project, for example: C:UsersusernameDocumentsNetBeansProjectsMyJardist
The next step is to copy the JAR file into Jmeters lib/ext folder. Once that’s done we’re ready to use our custom method in JMeter. For this tutorial, I created a blank page which displays a random number. I then used JMeter's Regular Expression Extractor in order to store the number in a variable called “digit”. We will be feeding this into our custom method to test that it works. The BeanShell sampler looks as follows:
 import test.TestClass; // import our package.java file (same as import statement in IDE)
 TestClass t = new TestClass(); // instantiate new TestClass
 int squaredResult = t.squareIt(Integer.parseInt(vars.get("digit"))); // store returned method value in squaredResult variable. Convert param to int since squareIt expects int
 log.info(squaredResult.toString());// Jmeter method to log output, convert param to string since log.info expects a string
A way we could extend the code would be to store squaredResult into a Jmeter variable using vars.put and use this elsewhere. Now that our BeanShell sampler is set up, let’s run our script. Doing so displays a page with a randomly generated number:
Our custom method should square this value. Checking the JMeter log file confirms our custom method works!
This was a fairly simple example but showcases how it is possible to develop complex methods in an IDE, test they work before then porting them into a JMeter BeanShell sampler were they can be used.
To learn more about the benefits of performance testing and the secrets of its delivery – download our ebook here.


